Loose flights, spare stems, chalk, tools and match darts have a habit of spreading across shelves, drawers and coffee tables. A wall storage station gives all that kit one home, close enough to the board to be useful but tidy enough for a living room, garage or spare bedroom setup.
The aim is not to build something complicated. A simple backboard, a few shallow shelves, hooks, small containers and a safe fixing method can turn an untidy playing corner into a proper darts area.
Any mains electrical work for lighting, sockets or hard-wired accessories near the storage area should be carried out by a qualified electrician to comply with UK electrical safety requirements and Building Regulations.
At a glance
- Use a flat backboard or rail system so accessories are grouped in one controlled area.
- Keep sharp darts covered or stored point-down where they cannot be knocked off.
- Put match essentials at hand height and occasional spares higher or lower.
- Choose wall fixings based on the wall type, not just on what came in the packet.
- Leave the throw area clear; storage should support play, not crowd the oche.
Plan the position before you pick up a drill
Start by standing at the oche and looking at the wall around your dartboard. The storage area should be easy to reach between legs, but it should not sit where a stray dart, swinging cabinet door or player movement will hit it.
For most home setups, the best position is to one side of the board rather than directly underneath it. This keeps the wall below the board free for a surround, mat edge, scoreboard or cabinet doors. If your board is in a shared room, it is worth thinking about how the area looks when darts are not being played. A narrow vertical station beside a cabinet usually looks neater than a wide shelf spread across the wall.
If your setup needs to disappear after use, plan the storage around the way the board folds, closes or gets covered. For more room-planning detail, see this guide to planning a foldaway dartboard setup in a living room.
Decide what the station needs to hold
Empty your current darts drawer or box and group everything by use. This stops you building shelves that look tidy on day one but do not match how you actually play.
Everyday match kit
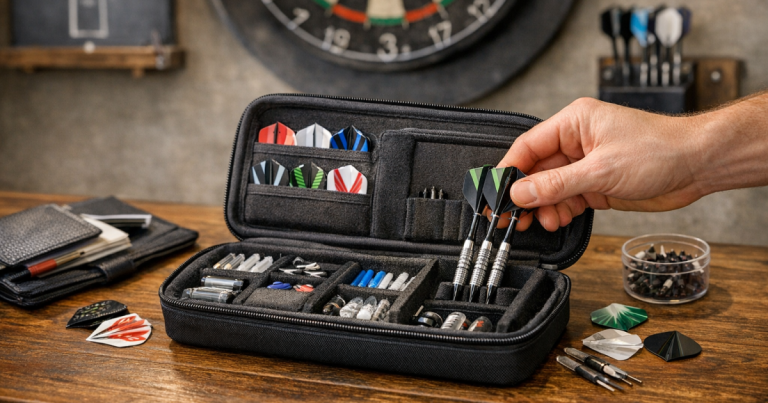
- One or two sets of darts.
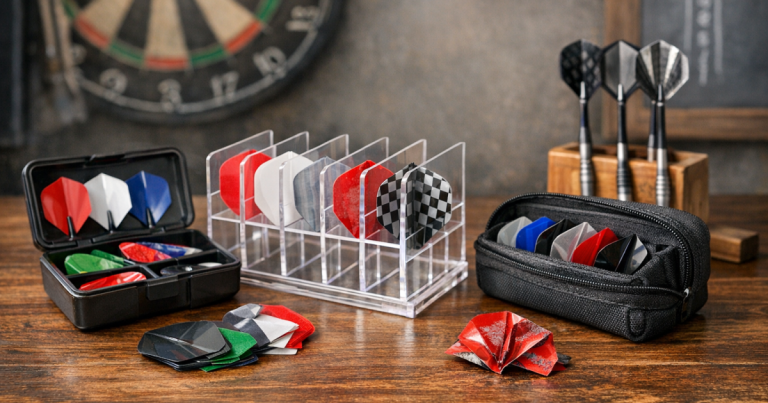
- Spare flights.
- Spare stems or shafts.
- Checkout card or small rules card.
- Dart tool, point protector or flight punch if you use one.
Occasional spares
- Extra flights in different shapes.
- Backup stems.
- Soft-tip points if you also use an electronic board.
- Chalk, dry-wipe pens or cloths for scoring.
- Spare mounting screws, wedges or small board accessories.
Room accessories
- Scoreboard pens.
- Oche tape or marker pieces.
- Small cleaning cloth.
- Remote controls for plug-in lighting, where used.
- Key or latch for a cabinet, if fitted.
Once you know the contents, sketch the station as zones: darts, flights and stems at the centre; pens and scoring items near the scoreboard; rarely used spares in lidded boxes or higher shelves.
Choose a simple base: board, rails or small shelves
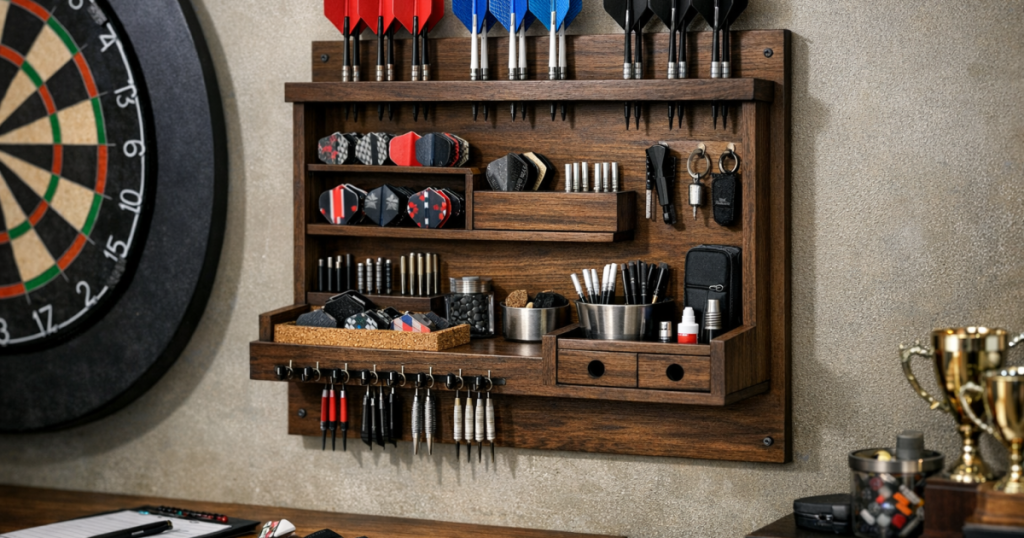
You have three easy ways to build the station. A timber backboard gives the most flexibility because you can screw hooks, tubs and shallow shelves into it without repeatedly drilling the wall. A metal rail or pegboard system is adjustable and neat, although small darts accessories can feel fiddly unless you add containers. Individual shelves are the quickest option, but they can look scattered if you keep adding more later.
For a tidy home darts area, a painted plywood or MDF backboard is usually the most adaptable. Keep it shallow, smooth the edges, and paint or seal it so chalk dust and fingerprints wipe away easily. In metric terms, a board around 300 mm to 500 mm wide is enough for most casual home setups, while a taller narrow board can hold more without taking over the room.
If the board will sit next to a dart cabinet, line up the top or centre line carefully so the whole area looks intentional. The same fixing principles used to mount a dart cabinet level on plasterboard are helpful when you want a storage panel to sit square and stay secure.
Build the wall storage station step by step
1. Mark the wall and check clearances
Use low-tack masking tape to outline the planned size on the wall. Open cabinet doors, stand at the oche, walk through your normal scoring route and check that nothing feels cramped. If the station sits too close to the board, move it further out before committing to fixings.
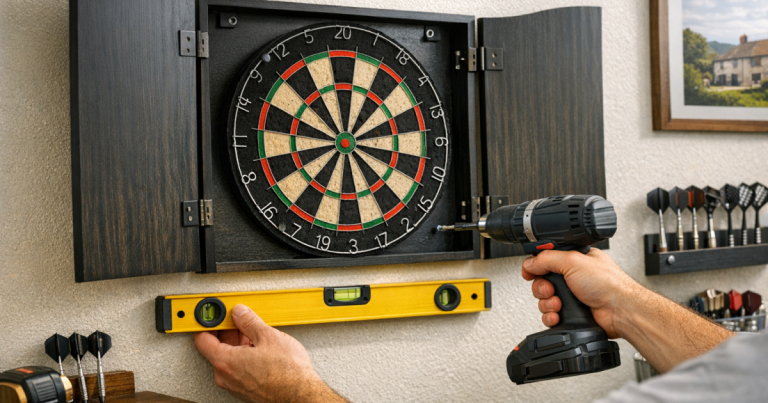
2. Check for cables, pipes and wall type
Use a suitable detector before drilling, and identify whether you are fixing into masonry, plasterboard, timber studs or another surface. The fixing method matters more than the weight of the accessories on day one, because people naturally add more kit over time.
For plasterboard, use fixings designed for hollow walls and keep heavy items off small unsupported screws. For masonry, use suitable wall plugs and screws. If you are fixing into timber studs, confirm the position and use screws of an appropriate length for the board and accessories being supported.
3. Prepare the backboard
Cut or buy a board to size, sand the edges and mark a centre line. If you are painting it, do that before fitting hooks and containers. A dark finish can look smart beside a dartboard, but a lighter finish makes small black stems, points and tools easier to see.
4. Add storage zones before mounting
Lay the board flat and test the arrangement. Use a small rack, foam-lined strip or covered holder for darts. Add shallow shelves for flight cases, small pots for stems, and hooks for cloths or lightweight accessories. Avoid deep shelves near shoulder height because they are easy to bump when collecting darts or scoring.
5. Fix the board to the wall
Hold the board level, mark the fixing points, drill carefully and secure it firmly. A second person makes this much easier, especially with a taller board. Once fitted, give the board a controlled pull by hand to check for movement before loading it with darts gear.
6. Load it in playing order
Put the items you use most in the easiest positions. Match darts should be accessible but protected. Flights and stems should be visible, not buried in tubs. Pens should sit close to the scoreboard, and spares should be separated so you are not tipping everything out during a match.
Small details that make it work better
The best storage stations are not just tidy; they make your routine smoother. Label small containers if several people use the board. Keep one empty tray for temporary items during a game, such as rings, watches or spare flights. Add a tiny notepad or checkout card if you prefer analogue scoring.
If you score on a dry-wipe surface, include a pen clip and cloth holder so the board does not become a dumping ground. You can also build a slim scoring panel into the same area; this guide on how to convert a whiteboard into a darts scoreboard is a useful next step if you want a neat, low-cost scoring setup.
For a shared household, think about end-of-game storage. A lidded dart holder or small lockable box is sensible if children visit or live in the home. Even if the station looks organised, sharp darts should not be left exposed where they can be pulled down or knocked off.
Common layout examples
The narrow side panel
This suits living rooms and compact bedrooms. Use a vertical board beside the cabinet with darts in the middle, flights above, stems below and pens on a small clip. It looks tidy and keeps the main wall area focused on the board.
The garage practice station
A garage setup can be more practical than decorative. Use a wider backboard with labelled tubs, a bigger shelf for spare accessories and a hook for a tape measure or oche marker. Keep everything shallow so it does not collect dust or get knocked by stored bikes and tools.
The family-friendly cabinet zone
If the dartboard is in a room used by children, build storage that closes or locks. A cabinet with internal hooks, a small top shelf for scoring items and a separate covered dart case is usually safer than open hooks. For more on managing the area between sessions, read the advice on how to childproof a dartboard area between games.
Checks before you call it finished
- Stand at the oche and confirm the station does not distract your sightline.
- Open and close any cabinet doors fully.
- Check that darts cannot roll or slide off shelves.
- Make sure sharp points are covered, enclosed or angled safely.
- Confirm pens and cloths are reachable without stepping into another player’s throw.
- Shake the storage board gently by hand to check for loose fixings.
- Leave space for future spares rather than filling every section immediately.
After a week or two, adjust the layout. You will quickly notice if the pens are in the wrong place, the flight tub is too small, or the dart holder feels awkward. A good wall storage station should evolve with the way you play.
Questions people ask
How high should darts storage be on the wall?
Keep the most-used items around comfortable chest to eye height for the main players. Store sharp darts slightly higher or inside a covered holder if children may access the room.
Can I build it without drilling into the wall?
For lightweight accessories, a freestanding narrow shelving unit can work, but it must be stable and outside the throwing path. Avoid relying on adhesive strips for anything that holds sharp darts or breakable items.
What is the safest way to store darts between games?
Use a case, covered rack or closed cabinet so points are not exposed. Do not leave darts loose on shelves, windowsills or the floor around the oche.
Should the storage be beside or below the dartboard?
Beside the board is usually better. Below the board often clashes with surrounds, cabinets, bounce-outs, scoring space and the natural route players take when collecting darts.
Do I need a large station for one set of darts?
No. A compact panel with one protected dart holder, a small flight box, a stem pot and a pen clip is enough for many home players. Leave a little spare space so it stays useful as your kit grows.
Main lessons
A good darts storage setup is built around habits, not just wall space. Place the items you use most where your hand naturally goes, protect sharp points, choose fixings that suit the wall, and keep the design shallow enough for everyday rooms.
Build it neatly once and your darts area will feel easier to use every time you play: less searching for stems, fewer lost flights, cleaner scoring, and a setup that looks ready rather than cluttered.