Missed doubles, bounce-outs and low darts are normal in a home setup, but they can leave marks fast if the area is bare. The aim is to protect floors and walls without making the darts space feel bulky, awkward or overbuilt. A good setup combines the right surface behind the board, sensible floor coverage, accurate measurements and enough breathing room for a natural throw.
Start with the areas most likely to take damage: the wall around the board, the floor beneath the board, the throwing lane and any nearby skirting, furniture or door frames. Once those are covered, the setup usually feels calmer to use and easier to keep tidy.
The short version
- Use a dartboard surround, cabinet or backing panel to catch missed darts around the board.
- Put a mat or protective strip along the throwing lane, not just at the oche.
- Check the board height and oche distance before deciding where floor protection should sit.
- Leave enough side clearance so players are not twisting their throw to avoid furniture.
- For rented homes, favour removable and freestanding protection over permanent fixing where possible.
Step 1: Get the board position right first
Protective gear works best when the board is already in the right place. If the board is too close to a side wall, too low, too high or squeezed into a narrow alcove, more darts will end up outside the safe area. Before adding mats or panels, check the basics: the bullseye should be at the correct height, and the throw line should be measured from the face of the board rather than from the wall.
For a standard steel-tip home setup, many players use a bullseye height of 1.73 m and an oche distance of 2.37 m from the board face. If you are reworking your room layout, it is worth checking the detail rather than guessing; our guide to setting the correct oche distance at home walks through the measuring process clearly.
Once the board position is confirmed, stand at the oche and look at the likely miss zones. Newer players often miss high and wide; more experienced players may create more bounce-outs around the treble and bull area. That tells you where the wall needs the most coverage.
Step 2: Choose wall protection that matches your room
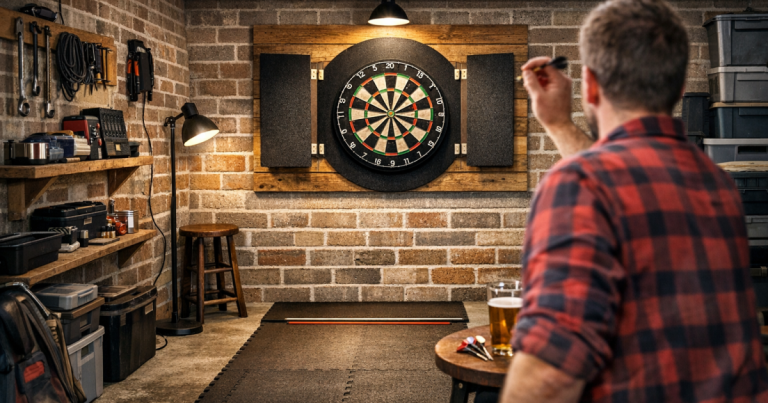
The wall behind a dartboard usually needs the most attention. A bare plastered wall can show holes, chips and scuffs quickly, and painted surfaces may mark even from light contact. There are three common ways to reduce damage: a surround, a cabinet or a larger backing board.
Dartboard surround
A foam or rubber-style surround fits around the board and is one of the neatest solutions for everyday home play. It catches many near misses around the doubles and outer board area, while keeping the setup compact. It is a good fit where the wall is otherwise clear and the board is mounted securely.
The main check is coverage. Some players only need a close-fitting ring around the board, while family setups, beginner practice areas and tighter rooms may benefit from a larger protective area. If you want to see what this looks like in practice, the Winmau dartboard surround review looks at fit, coverage and wall protection in more detail.
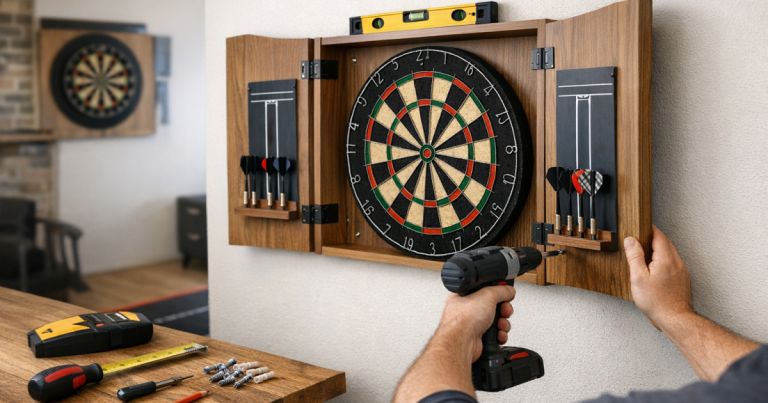
Dartboard cabinet
A cabinet can protect part of the wall and also gives the setup a tidier look when the doors are closed. It suits living rooms, spare rooms and shared spaces where the board needs to look less exposed. The trade-off is that open cabinet doors do not always cover the same wide miss area as a full backing panel, especially if players miss far left or right.
If you use a cabinet, check the area above, below and outside the doors. Many wall marks happen just outside the neat-looking protected zone, particularly during casual games with mixed ability levels.
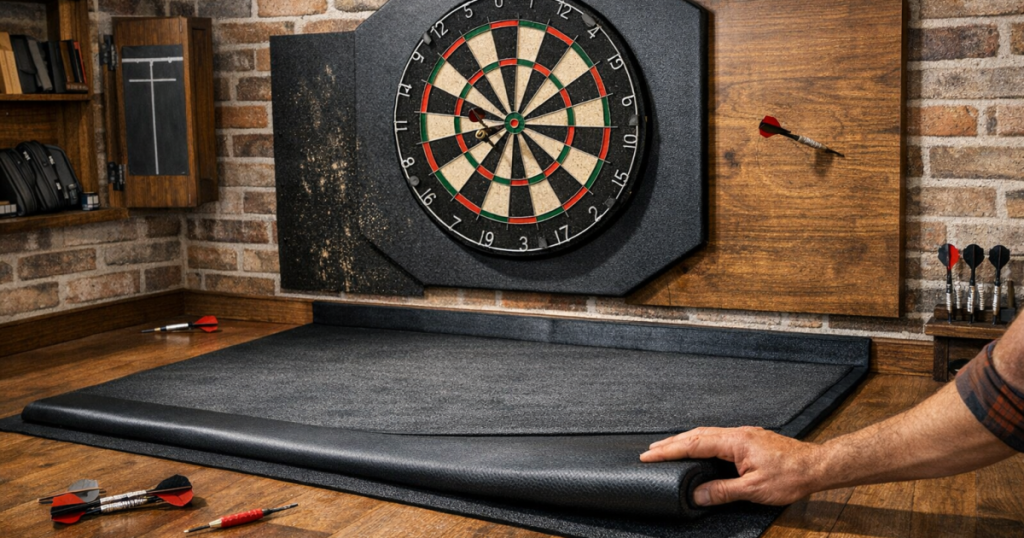
Backing board or panel
A larger backboard gives the broadest coverage. Cork, felt-covered board, plywood faced with a softer material, or a purpose-made darts backing panel can all work, depending on the room and how permanent the setup is. The key is not just size, but placement. The panel should sit behind the likely miss zone rather than simply looking centred on the wall.
For a garage, shed or dedicated darts room, a larger panel can be the most forgiving choice. In a living room, a more compact surround or cabinet may look better, but it needs to be positioned carefully so it still does the job.
Step 3: Cover the floor where darts actually land
Floor damage tends to come from two sources: darts dropping out of the board and darts landing short after a poor release. Hard floors can dent or chip, while darts can disappear into carpet, damage fibres or become easy to step on. The answer is usually a darts mat, a runner-style mat or a protective floor strip that covers both the throw line and the landing area near the board.
Do not only protect the exact spot where your feet go. A mat that marks the oche but leaves the board area exposed may still allow bounce-outs to hit timber, laminate or tiles. The most useful floor coverage runs from the throwing position towards the board, with particular attention to the space directly below the board.
On carpet, a mat can also stop the oche position from slowly shifting during play. On smooth flooring, check that the underside sits flat and does not slide when players step forward. If the mat moves, the oche line becomes unreliable and the setup feels less settled.
Step 4: Do a bounce-out and miss-zone check
Before you decide the setup is finished, throw a few normal practice visits and watch where darts go when they do not stick. Do not deliberately throw at the wall; simply observe natural misses and bounce-outs. The important areas are often lower than people expect, especially beneath the board and slightly forward into the room.
- Look below the bull: Darts can drop almost straight down after hitting wires or other darts.
- Check the skirting area: Skirting boards and radiator pipes near the board can take repeated knocks if left exposed.
- Watch the outer doubles: Wide misses around double 1, double 5, double 20 and double 18 are common in casual play.
- Check the throwing lane: Short darts can land between the oche and board, not just at either end.
- Test with different players: A setup that works for one tidy thrower may not suit guests, juniors or newer players.
If you see repeated marks just outside the protected area, adjust the protection rather than hoping players will avoid that spot. Home darts areas usually get more relaxed over time, so the setup should cope with ordinary mistakes.
Step 5: Keep enough space around the throw
Wall and floor protection cannot fix a room that is too tight. If a player is standing close to a sofa, door frame, shelving unit or side wall, their throw may change without them realising. That can create more stray darts and make the whole area feel less comfortable.
Stand at the oche with your darts in hand and go through your normal throw. Check elbow movement, follow-through, foot position and whether anyone can walk across the line of play. If the answer is no, the setup needs more space or a different layout. For layout fixes, the guide to sorting a darts setup that feels too cramped is a useful next step.
Pay attention to side clearance as well as distance. A narrow space can make right-handed and left-handed players miss in different ways, so it is worth testing both if the board will be used by several people.
Step 6: Think differently in rented homes
In a rented property, the best protection is often the protection that can come away cleanly. A freestanding dartboard stand, a non-permanent floor mat and a removable surround can reduce the need for wall fixing. If you do mount anything, check the tenancy terms and use a method that suits the wall surface.
Avoid relying on small adhesive hooks for anything heavy or impact-prone. Darts equipment is handled regularly, and repeated vibration can loosen weak fixing points. If permanent fixing is not suitable, a stand or a large freestanding backing panel may be a safer and tidier option for the property.
Also think about storage. A roll-up mat, portable oche marker and removable surround can be packed away when the room needs to return to normal, which is handy in flats, shared houses and multi-use spare rooms.
Step 7: Protect the awkward details
Small details often decide whether the setup stays looking good. The wall may be covered, but the nearby door architrave, skirting, radiator, plug socket area or furniture edge could still be exposed. Walk around the board and look at anything within reach of a stray dart.
- Skirting boards: Use floor coverage that reaches close enough to the wall to catch low drops.
- Furniture: Move side tables, baskets and storage units away from the throwing lane where possible.
- Painted walls: Choose wider wall coverage if you have a dark or easily marked paint finish.
- Garages: Check concrete floors for dart tip damage and use a mat to stop tips from blunting quickly.
- Shared rooms: Make the protected area obvious so guests know where to stand and where not to walk.
Lighting can also affect misses. If shadows make the trebles hard to see, players may adjust their aim or release without meaning to. Good light does not directly protect the room, but it reduces avoidable mistakes and makes the board easier to use consistently.
The big picture
The best way to protect floors and walls is to treat the darts area as a small playing zone rather than just a board on a wall. Start with correct measurements, add wall protection around the likely miss area, cover the floor where bounce-outs and short darts land, then test the setup with real throws. If the room is shared or rented, choose protection that is tidy, removable and easy to reset.
You do not need to overbuild the area. A well-positioned surround, sensible mat and uncluttered throwing lane will solve most home darts problems. The main thing is to protect the surfaces before the first obvious cluster of holes, dents or scuffs appears.
Things readers ask
Do I need both a surround and a darts mat?
For most home setups, yes. A surround protects the wall around the board, while a mat protects the throwing lane and floor beneath the board. They solve different problems.
Will a cabinet protect the wall enough?
A cabinet can help, but it may not cover wide misses outside the doors. It works best for neater throwers or rooms where appearance matters, but beginners may need wider backing.
What floor type needs the most protection?
Hard floors such as timber, laminate and tiles show dents and chips more readily. Carpet hides some impact, but darts can still damage fibres or become hard to spot.
Can I use a normal rug instead of a darts mat?
You can use a rug for basic surface protection, but it should sit flat, stay in place and clearly mark the oche if you rely on it for distance. A shifting rug can make the throw line inconsistent.
How wide should the wall protection be?
There is no single perfect width for every room. Base it on who plays, how often they miss, and what sits near the board. If newer players use the setup, wider coverage is usually more forgiving.
What to remember
Good protection is not just about buying one accessory; it is about placing the board, mat and surrounding space properly. Cover the likely miss zones, keep the throwing lane clear, and adjust after watching real play. That gives you a home darts setup that feels relaxed to use and much kinder to the room around it.